Dialog API Tutorial
The Dialog API uses symbolic techniques to form a control plane, accelerator, and LLM router for text, voice, and multimodal inputs. It enables the rapid "twitch" reactions needed for maintaining a realistic dialog with a character, while reducing your spend on LLM resources, and increasing your control over the resulting experience.
The Dialog API itself is completely stateless. Each request contains the text input to respond to, data about the conversation state, and a 'mind id' that specifies the set of rules to be used. The response consists of the text output and an updated version of the conversation state. The API is designed to be called from your web server. It provides fast, direct answers to many inputs, and helps coordinate access to slower and more expensive external APIs, including Large Language Models (LLMs), for others. While many chat applications today are powered exclusively by an LLM, the Dialog API can result in faster, more predictable responses while lowering overall costs.
This tutorial accompanies the Dialog API Reference Implementation available at https://github.com/mediasemantics/dialogapi.
Creating a Mind
In the Dialog API, a Mind is a collection of Models, and a Model is a collection of Facts and Rules. Facts and Rules are authored in the Models tab within the Dialog API's dashboard.
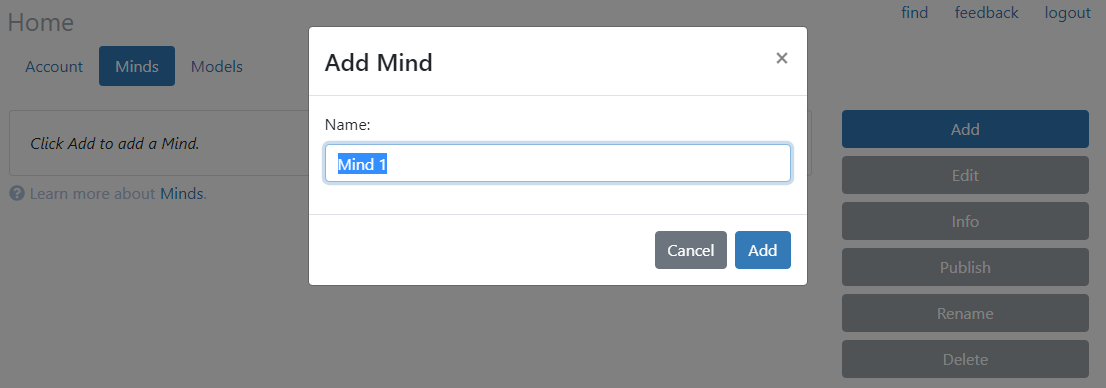
To get started, you can use the Dialog API's Dashboard to create a Mind. Go to the Minds tab and click Add.
Next, we need to create a model. Go to the Models tab and click Add. Then select it and click Edit.
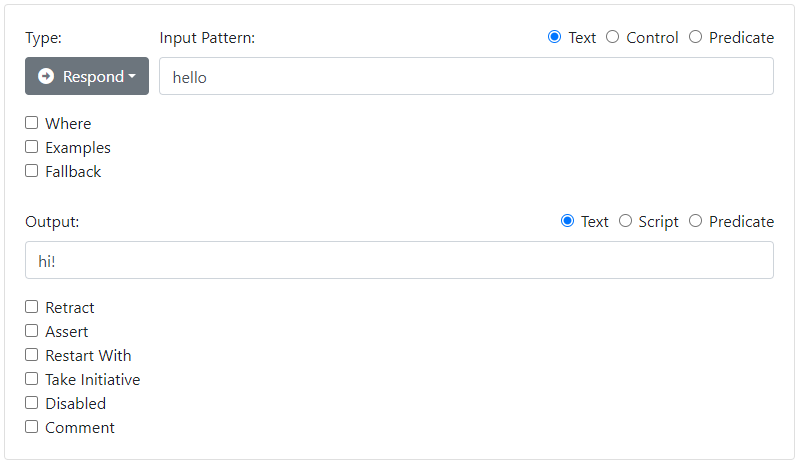
Create a very simple first rule by clicking Add Rule. Fill in the Rule Details section with an Input Pattern and an Output:
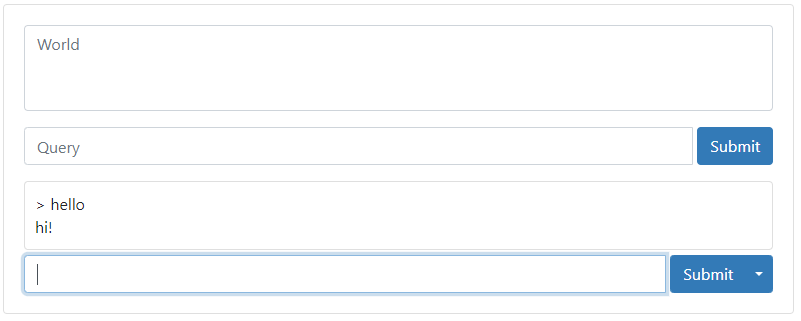
You can test your rule immediately in the Model Tester section at the bottom:
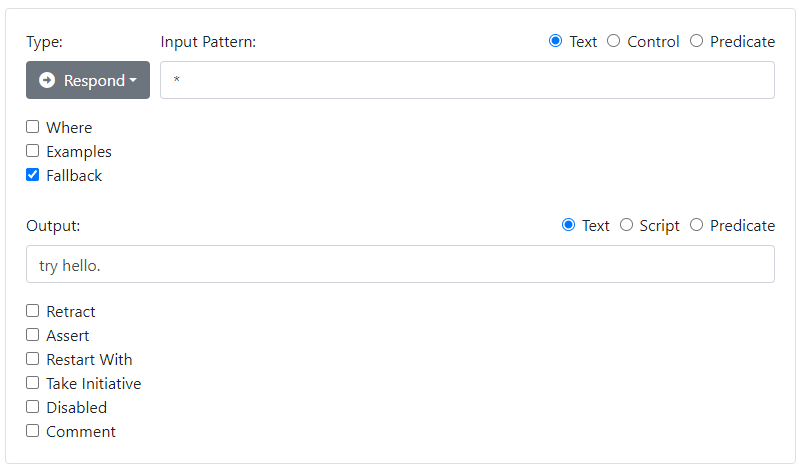
Create another rule as follows to act as a fallback.
Go back to the Models tab, and click Publish.
Now go back to the Minds tab, and Edit the Mind. Click Use. Select your new model from the list and click Select. Your mind is now using your new model.
Click Home, select your mind, and click Publish.
Note that the Mind and Model Testers will always take into account your latest Mind and Model changes, but changes will not be seen by API callers until you Publish them. You can normally Publish new Minds or Models while they are being used - the update will become available with the next input.
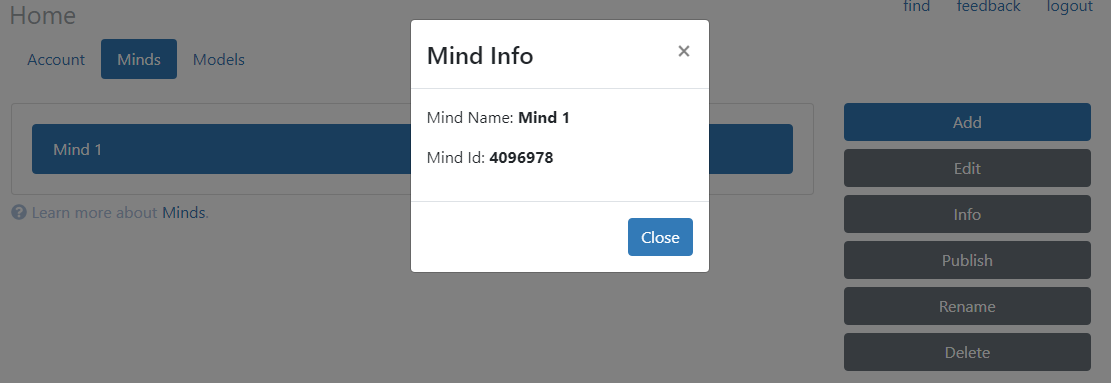
Click Info to see some important information about your Mind, including its Mind Id. You will use this information in the next step.
Calling the API from curl
We can call the Dialog API's 'reply' endpoint using a tool such as Postman, or curl.
$ curl -s -d key=xxxxxxxxxxxxxxxxxxxxxxxxx -d input="hello" -d mindid="xxxxxxx" http://api.mediasemantics.com/reply | json_pp
You will need to replace xxxxxxxxxxxxxxxxxxxxxxxxx with an API Key that you obtain from the API Dashboard for the Dialog API. You will also need to replace the mind id xxxxxxx with the Mind Id for your Mind. Here is the output:
{
   "data" : {
      "history" : "> hello\nhi!\n"
   },
   "output" : "hi!"
}
The API returns a JSON object. We started the conversation without a data parameter, which is equivalent to using -d data="{}", i.e. an empty JSON object. The call returns with a state object containing the state of the newly started conversation. To continue this conversation you would simply pass the same object back on your next call to 'reply'.
A Client-Based Implementation
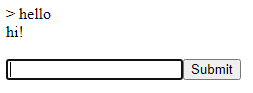
In order to maintain a conversation, you will need to store this state somewhere - one solution is at the client. Here is a simple HTML app that lets you converse with the bot:
<!DOCTYPE html>
<html>
<head>
</head>
<body>

<div id="div1">
</div>
<br>
<input id="input1" type="text" autofocus onkeypress="keypress()"><button onclick="submit()">Submit</button>

<script>
var data = {};
function submit() {
    // Grab the user input and clear the input box
    var input = document.getElementById('input1').value;
    document.getElementById('input1').value = "";

    // Add the input to the transcript
    var div = document.getElementById('div1')
    div.innerHTML += "> " + input + "<br>";

    // Call the reply API
    var xhr = new XMLHttpRequest();
    xhr.open('POST', "http://api.mediasemantics.com/reply", true);
    xhr.setRequestHeader("Content-Type", "application/x-www-form-urlencoded");
    xhr.onload = function () {
        var o = JSON.parse(xhr.response);
        // Add the output to the transcript
        if (o.output) div.innerHTML += o.output + "<br>";
        // Save the data for the next round
        data = o.data;
    };
    var key = "<your keycode here>";
    var mindid = "<your mind id here>";
    xhr.send("key=" + key + "&mindid=" + mindid + "&data=" + encodeURIComponent(JSON.stringify(data)) + "&input=" + encodeURIComponent(input));
}

function keypress(e) {
    if (event.keyCode == 13)
        submit();
}
</script>

</body>
</html>
Because it calls a web API, you should run this from a localhost web server.
The result should look something like this:
A Server-Based Implementation
While you can call the API directly from a client, we normally recommend that you call it from a server application that you manage. After all, your API key needs to remain a secret to prevent others from copying your page and gaining access to your bot. In addition, you will want to store the conversation state data object in a permanent fashion, to avoid losing the conversation when the page is closed. You will want your own server to provide authorization, session detection, and storage. In an embodied agent application, this is often the same server as the caching server.
The Dialog API Reference Implementation client code is based on the above code, but is modified to talk to a simple Node.js server that implements its own GET 'reply' endpoint. This endpoint runs on your server, does not require an API key, and drops the data object parameter in favor of a simple userid. On each call, the userid is used to look up the previous data object from a simple file-based database. The request is then packaged back into a POST request that includes the API key and data object, as before. We have essentially replaced a stateless API with a stateful API that lets you manage the conversation state on your own server.
http://localhost:3000/reply?input=hello&userid=5132543
The return contains the same response, but without the conversation state:
{"output":"hi!"}
If your application includes a login, then you will already have a user id that you can use as a key to store the conversation state. If you do not require a login, then you can generate a unique user id that can be used for the duration of the client session, to identify that user. You can save this userid in a session cookie, so that you can allow the user to carry on a continuous conversation even when they navigate to another page on your site.
Here is a simple node.js implementation of such a server.
var express = require('express');
var bodyParser = require('body-parser');
var fs = require('fs');
var request = require('request');

app.get('/reply', function(req, res, next) {
    if (!req.query.userid) throw new Error("missing userid");
    if (!req.query.input) throw new Error("missing input");

    // Load the data for this user from disk, if available
    let filename = "./conversations/" + req.query.userid + '.json';
    fs.readFile(filename, "utf8", function(err, raw) {
        let data;
        if (err)
            data = {}; // Use empty data object on first call for this user
        else
            data = JSON.parse(raw);

        // Call Dialog API
        let params = {
            key:"<your keycode here>",
            input:req.query.input,
            data:JSON.stringify(data),
            mindid:"<your mind id here>"
        }
        request.post({url:"http://api.mediasemantics.com/reply", form:params}, function (err, httpResponse, body) {
            if (err) return next(err);
            if (httpResponse.statusCode != 200) return next(new Error("chat error"))
            let ret = JSON.parse(body);

            // Write the data back again
            fs.writeFile(filename, JSON.stringify(ret.data), function(err) {
                if (err) return next(err);

                // Return the response
                res.statusCode = 200;
                if ((req.get("Origin")||"").indexOf("localhost") != -1) res.setHeader('Access-Control-Allow-Origin', req.get("Origin"));
                if ((req.get("Origin")||"").indexOf("youdomain.com") != -1) res.setHeader('Access-Control-Allow-Origin', req.get("Origin"));
                res.setHeader('content-type', 'application/json');
                res.write(JSON.stringify({output:ret.output}));
                res.end();
            });
        });
    });
});

app.listen(3000, function() {
  console.log('Listening on port 3000');
});
Assuming you place this in a file server.js, you can run it with "node server". Before you start the server, you should ensure that you have an empty subdirectory "conversations", with read/write permissions, in the server.js directory.
The POST in our client code becomes a GET:
// Call the reply API
var xhr = new XMLHttpRequest();
xhr.open('GET', "http://localhost:3000/reply?userid=" + userid + "&input=" + encodeURIComponent(input), true);
xhr.onload = function () {
    var ret = JSON.parse(xhr.response);
    div.innerHTML += ret.output + "<br>";
};
xhr.send();
Note that the simple file-based mechanism in the Reference Implementation does not let you scale to multiple server instances, and a better solution might be to use a database such as Redis or AWS DynamoDB.
You will note that the data object may acquire fields such as 'history' and 'world'. While you can treat the data object as an opaque bundle that simply needs to be stored and passed back, more advanced uses include extracting valuable information and storing it in a manner that is more digestable for your application. You should note that the 'history' field contains only a partial history of the conversation for use by the engine, so you might consider maintaining a complete transcript on your server by logging the actual inputs and outputs. These logs can be analyzed to guide further rule development. There are significant privacy implications associated with both logs and conversation state, and a privacy and data-destruction policy will need to be factored into any complete solution.
This is the essence of the Reference Implementation, but we will build a few refinements in the following sections.
Control Inputs and Tags
It can be helpful to provide the dialog system with all kinds of other non-verbal "control" inputs that can make it aware of the context in which the user is operating. For example you might send a control input when the user navigates to a link, or when they scroll to a different point on a page.
> [nav]
> [scroll order]
Control inputs are always shown in square brackets. You can write rules that react specifically to control inputs. Not all inputs require an output. In many cases a bot will just respond to a control input by adjusting some state in the conversation data object. In this case the reply will be an empty string.
Note that outputs that are meant to be delivered by a character can also have non-verbal elements, such as actions to take, or the manner in which to say something. These commands take the form of output tags, also in square brackets, that are meant for the animation and/or the speech system.
Auto-Start and Chat Sessions
By storing the data in a permanent location, a conversation never really ends. The user can return with the same userid many days later and the bot could respond as if nothing had happened. While this is good, the very act of coming back to a conversation after a period of absence is itself an important piece of context, and deserves a control input.
The Reference Implementation client and server work together to send a few standard control commands when the page containing a chat UI opens.
- If the user is not known in the database, then the [new] command is sent on to the Dialog API.
- If the user is known in the database, but this is a new browser session, then the [return n] command is sent, where n is the number of minutes since the last communication.
- If this is the same session then the [nav] command is sent when the chat UI becomes available, as this normally means the user has navigated to another page within the site.
One purpose of these commands is to assist in creating an appropriate opening prompt, be it a greeting for a new user, a greeting for a returning user, or perhaps an acknowledgement that the user has navigated to a new page on the same site. Of course whether an actual output is generated is up to the rules. In an embodied agent situation, remember that the output can be non-verbal: it can be as simple as a short nod, or a glance at the page.
...
> thank you.
You are welcome!
(2 days elapse)
> [return 2880]
Welcome back! How can I help?
Your implementation might also use a button to open a "popup" chat UI. This is a great way to keep the agent tucked away until it is needed. In this case an [open] input is normally sent whenever the user actually clicks the button. However you might still use auto-start commands to start the dialog before the popup is open. If the popup is closed, a verbal output might simply result in a "badge" on the chat button indicating that there are unseen messages, and inviting them to open the chat window. When they do, the text appears in the chat history and the conversation can continue.
Rules can be used to remember facts about the user. In fact the auto-start control commands can be used to let an agent build up a model of the user's page views over several sessions, even before the first conversation has occured.
Browsers normally disable audio for pages on a website prior to the first click on one of the site's pages, and this may also factor into your plans for the initial user experience if your UI employs a talking embodied agent. In some cases we recommend using a "play shield" that invites the user to click on a character to begin interacting with it. In this case the auto-start command is sent when the play shield has dropped, and the user perceives the agent to be frozen until explicitly activated.
In some situations you may not want to use auto-start commands at all. For example you might simply have an open input panel, in which case your first input could be a question from the user. Developing the right first-time and returning experience will depend on all of these factors.
Idle
The Reference Implementation also lets an agent take the initiative after an "idle" period. A rulebase can contain one or more "Idle" rules for this purpose. To understand how idles work, imagine having the client poll the server periodically to see if an idle is available. Imagine a count which increments each second of inactivity on the part of the user. The client can poll the API using a special [idle n] control input, where n represents the idle count. An empty response is returned if there is no idle action to perform. For example, you might have an "idle" rule that triggers after a 3 second idle. The sequence might look like this:
> hello
Hi!
> [idle 1]
> [idle 2]
> [idle 3]
How can I help?
Polling is inefficient, and the Dialog API allows us to do better. At the point where the "Hi!" Response is returned, the state object contains an 'idle' value that represents the n value for the next idle input that will result in an actual output. In this case this would be 3. So instead of asking for [idle 1] and [idle 2], the client can wait until the count reaches 3 and then ask directly for [idle 3].
> hello
Hi! (with idle=3)
> [idle 3]
How can I help?
The resulting output will contain a new idle value that then determines when the next checkin will occur. For example you might have a second idle rule set for idle count 6. In this case the response for [idle 3] will contain the value idle = 6. Now triggering [idle 3] does not reset the idle count, since there was no user input, so it keeps on counting 4, 5, and 6, at which point [idle 6] is sent.
> hello
Hi! (with idle=3)
> [idle 3]
How can I help? (with idle=6)
> [idle 6]
Goodbye.
The Reference Implementation contains sample code to implement the idle mechanism as described.
Calling External API
With its stateless design, the Dialog API's 'reply' endpoint cannot itself perform any external queries or initiate any transactions - it is strictly a translator. However you can use tags and control inputs to coordinate these activities from your own server.
Your rules can include tags that are intended for your own server, on the return path. The contents of these tags can be in any format you like, as long as they are enclosed in square brackets. For example you might use a rule to respond to "what is the price" with an output such as "The price is [select price where sku='12345']". In this case your server needs to do more than just blindly pass everything through. When it receives the output from the Dialog API, it first scans it for command tags that it recognizes. If a tag is found, then the response is delayed until the tag is replaced with the appropriate results, after performing the required database call or web API.
In some cases a single user input could result in multiple Dialog API calls. For example "I'd like to transfer 100 dollars" might result in a structured output tag with all the context your server needs to dispatch the transaction, such as [transfer,100,12345,54321]. The result of the transaction might be a confirmation number. Rather than return this confirmation directly to the user, you could send a control input back to the Dialog API, such as [confirmation 123]. There you can use a rule to respond with an appropriate user message, while also altering the data object with this new context. A sequence diagram is helpful for visualizing this:

It's a bit like watching the system talk to itself for a few rounds before answering the user. This type of request ping-pong between different services is common in modern web systems.
Indeed, going back to the "what is the price" example, instead of filling in the answer on the way out to the user, one can imagine the database system returning to the Dialog API with a control input [data sku='12345' price='99.95'], or even [data sku='12345' error='no such product'], that would allow another rule to create the appropriate output. Keeping the Dialog API in the loop allows it to be more flexible. In a very real sense, the rules drive a conversation not just with the user, but also with multiple subsystems.
To further facilitate this, the Dialog API supports the notion of "payloads" that are associated with inputs or outputs. Payloads are packages of JSON data that do not appear in the transcript, and are normally signaled by the presence of a specific command tag, such as [price query] or [price data]. On the way out of the Dialog API, this allows parameters to flow directly to the correct subsystem without needing to parse it from the text within the tag itself. In the next tutorial we will also see how the payload data can be linked to a schema that allows it to be swapped in and out of working memory in a format that is easily queryable by Dialog API rules.
Relationship to LLMs
If you are familiar with how LLMs and Generative AI systems are used today, then the back-and-forth dialog described above may remind you of that between an LLM and its "tool" APIs, and you would be right. The difference is that the Dialog API's symbolic nature makes it several orders of magnitude faster and less compute-expensive. The flip side of this is that a system entirely built on symbolic rules will fail to provide the flexibility and robustness of an LLM approach employing billions of parameters and trillions of floating point operations (FLOPs) per input.
For this reason the Dialog API is meant to complement an LLM rather than replace it. Communication with an LLM occurs using the same control message mechanism introduced above, so the LLM call originates from your server, and not from the Dialog API. The idea is to let symbolic rules take an initial attempt at all input. For control inputs and common text inputs, or inputs in a well-defined domain, simple rules can provide an immediate answer without deferring to a more expensive LLM. Moreover the answer is deterministic - it can be fully understood and rigorously tested. Think of it as an accelerator for frequent inputs. For other inputs, rules can repackage the input, along with additional context, to send to an LLM. They can even "route" between multiple LLMs, depending on the needs. LLM results can coexist with direct results, and can even be reinterpreted and annotated with further meaning.
There are three main techniques for building intelligent systems, namely symbolic, connectionist, and probabilistic. Each approach has advantages and disadvantages. The Dialog API is an attempt at bridging the first two approaches in what might be referred to as a neuro-symbolic approach.
Minds and Models
This tutorial focuses largely on the integration aspects of the Dialog API, but it is helpful to understand a bit more about the capabilities of the underlying rule engine.
The Dialog API uses a symbolic framework to convert text inputs to text outputs. The engine combines many different capabilities, not all of which may be relevant to every project. Some key features include:
- Multistep transformation using both syntactic and semantic rules
- An efficient, chart-based approach that considers end-to-end context before committing to an interpretation
- A predicate-based user store that allows for the accumulation of working knowledge and long-term memories
- Output that is well-adapted to a situated and embodied agent, including support for multimodal inputs and non-verbal behaviors
- An efficient, stateless design that allows for ultra low costs and latencies on domain-specific responses
- A framework for harnessing slower and more expensive external APIs, most notably LLMs
In the Dialog API, a Mind is a group of units called Models. You might have a Model for introductions, a Model for queries about a certain topic, a model for simplifying wordy sentences, etc. Minds can also employ Stock Models that provide a significant jump-start to development.
A Model is simply a collection of rules. Rules combine to transform text events from the User (inputs) into text events from the Agent (outputs). A single transformation from input to output might use multiple rules, and those rules might span multiple Models. It is helpful to view each rule as a very simple expert with a specific purpose. The rules cooperate to form a "bridge" from the input to the output. However only one complete bridge must win out to form a response, and you can think of rules as competing for the chance to contribute to that bridge.
There are several different types of Rules. Some rules serve to "restate" the input into a simpler, more canonical form. Other rules are used to "respond" to a specific input with a specific output, in context. Some rules serve only to "generate" the output. Rules can be influenced by, and can contribute to, World Knowledge. World Knowledge is stored and accessed using Predicates and Predicate Unification, in a manner similar to Prolog. Rules can operate on control and text inputs but also on intermediate results in either text or predicate form.
Wrapping Up
The Dialog API and Reference Implementation provide you with a modern framework for building dialog-based applications. They can be used alone, or in conjunction with the Character API to create embodied conversational agents.
This tutorial has focused on how to connect the Dialog API to your application. The next tutorial in this series will focus on writing rules.